Tuesday, May 2, 2017

And Miles To Go Before I Sleep

     Coming up on 8 weeks now since I started the van.  God I am tired.  But the good news is its actually starting to look a lot like what I envisioned.

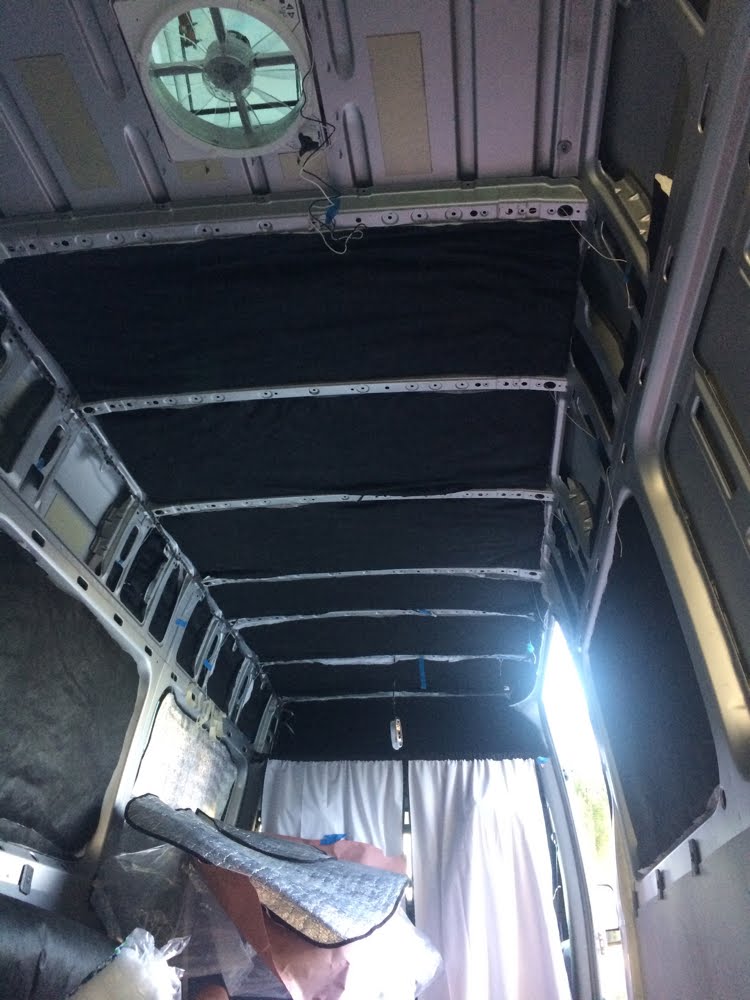
Picking up after my last entry, I continued my experimental upholstery work.  I'd read that 1/8th inch plywood would be pretty wavy if used as paneling but as I'm going to be fighting the GVWR, I need to save weight where I can.  Pro Tip: Ceiling panels are hard when done by yourself!


I opted to use pop rivets whenever possible rather than screws and it turned out to be a good decision.  They look a little cleaner IMO and they won't twist the vinyl when I get to that point.


I ordered $80 worth of warm white shallow can LED's for the main ceiling lights and wired each through its own individual switch.  One of the things I learned from my trailer was that you can really pinch down the amp usage with simple little tricks like only using light where you need it.


As the panels went up I couldn't resist the urge to poke more holes in a perfectly good roof.  I added cargo lights at the rear and side doors, plus a HAM antenna that I'll need later.  They'll come in handy when the zombies come.


I ditched the massively uncomfortable and space-robbing bench seat for a single captain's chair for the offspring.  Mostly I needed the space but he now has the most comfortable seat in the van.


I discovered the magic of a well-lit industrial park.  My van is just one of several and the street lights drown out the light escaping from inside.  Despite being half a block from the police station, and having cops zoom by at breakneck speeds all during the night, I haven't had a single incident.  The downside is its well-occupied during the day so I have a different location that I use before 10pm.


Once the ceiling was done I started in on the walls.


Hey the cabinets finally make a comeback!  I was debating these little gems on the Home Depot website.  At $150 each they were a bit spendy but seemed to fit what I needed.  I popped on to show the wife and get her input and found them on sale for half off!  Sold!  I mounted them using 2 rows of unistrut - amazing stuff that gets used extensively in industry but still hasn't really found its way into most DIY projects.  A shame really.


Cabinets and some covered wall panels up and its starting to actually look like something you'd want to live in.


It had been awhile since I'd had an injury so I decided to dump out the cut cabinet scrap and catch my fingers as it went into the trash.


A kiddie bed just wasn't happening with the space available above the seats so I built this little unit to house the stereo/DVD.  I ran a video output for a larger screen that will be located in the rear of the van.


Originally I had thought to make a crazy sliding murphy sofa/bed but it just got too complex and heavy.  Plus, the offspring's chair ended up getting moved more towards centerline to avoid the fuel tank under the chassis.  This meant the fridge needed to be moved back, thereby cutting into bed space.  It will all make sense in a few more pics.  But hey, a bed base with storage underneath!


Okay make that slightly less storage as I mounted the hot water heater under it.  At this point, cutting holes in this thing has become a bit of a hobby.  Barely visible at the front of the bed is the Espar heater which takes a tap off the diesel tank and provides heating for the cabin.  It ate up a bit more space under the bed but will be invaluable on cold nights.


My wife is short.  She doesn't need a whole lot of bed.  So rather than get design crazy I decided to build her a custom bed for her short stature and a footwell to accommodate my human-sized frame.


At this point the mess of wires was starting to wear on me.  I enlisted the help of my offspring and set off to take care of it.  I use flooded batteries so I wanted a tray that I could slide out for easy maintenance.


While we're on this side, why not throw up a panel?  Also my first speaker finally found a home.


Battery tray done, its time to enclose those bad boys in what will become the base for the fridge.


I partitioned off a section to use as the distribution center.  Batteries release hydrogen during charging so best to put any potential sparks away from them.  Also you want to have the solar controller mounted close to the batteries so this made a nice home for it as well.


The battery compartment got a floor vent.  Not exactly ideal since hydrogen rises, but with the exhaust fan on the roof this should pull a pretty good draft.  I added a bit of filter material to keep the bugs out.


As long as I'm under the van, I might as well address the exhaust off the water heater.  The stock pipe blew into the bumper so I trimmed it and added a downturn.  Nice and stealthy!


Fridge base is looking ready to have a fridge.  I covered it thinking that some of it might be visible.  Nope.  Wasted that vinyl.


I built up around the fridge to add more insulation and keep it secure.  It really doesn't need more insulation as its extremely efficient already but I figured it was a good use for my leftover thinsulate.  The fridge is made by Engel and I'm honestly quite amazed by its performance.  I did a bit of testing in my living room when it arrived.  It pulls 4A when it kicks on but this slowly drops off the longer the compressor runs.  Once it reached temperature it only kicked on every 11 minutes, giving me a total draw of 1.2A/hour.  It was so little that I decided to only buy 2 batteries instead of 4.  Granted my testing was done in a 72ยบ room.  Real world testing will ultimately decide if I need to add the additional batteries, but that's a huge savings of money and weight if I can run with half of what I planned.


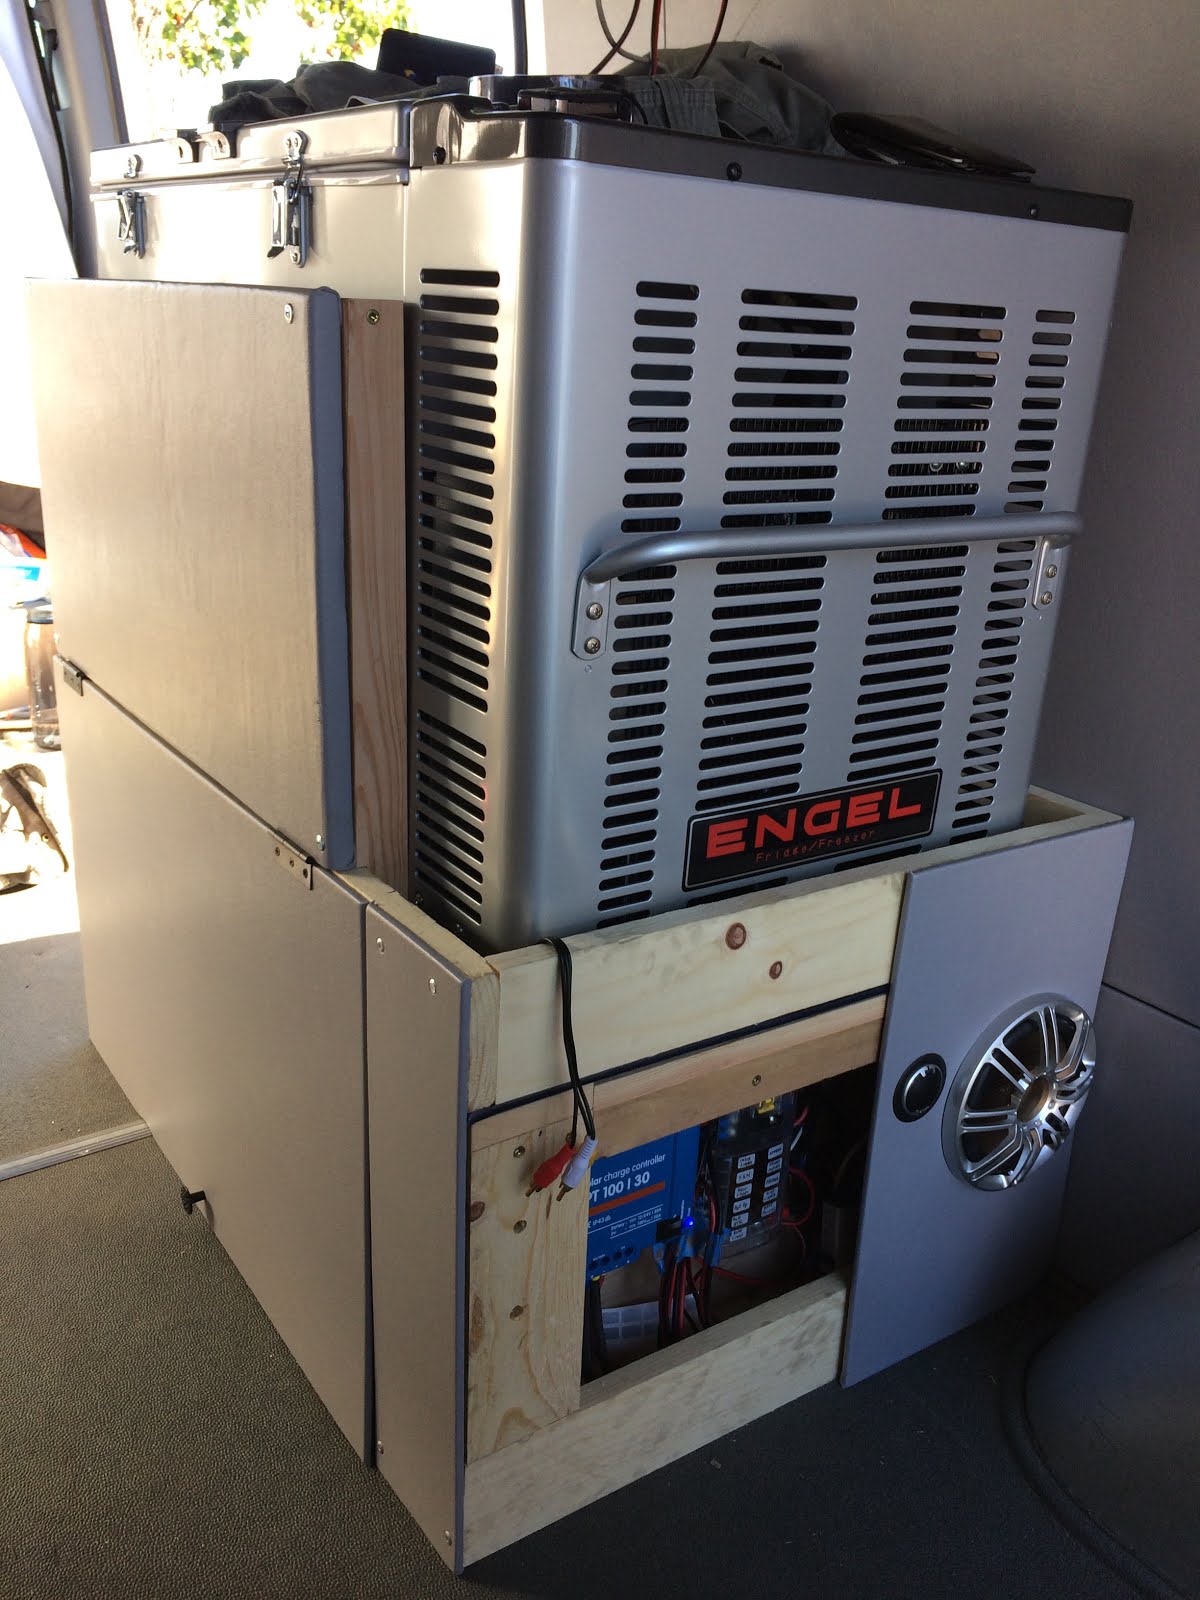
I also installed some of the DC outlets that I'm using.  Each one has a 12v socket, a 1.1A USB, and a 2.1A USB.  Another common power mistake that I see folks use is to rely too heavily on AC.  You have a DC system, why are you trying to charge a DC item like a phone or laptop using AC?  You waste about 40% more power every time you convert it.  Even worse is to use one large inverter to carry all potential AC loads.  An inverter is incredibly inefficient already, so if you have to use one, the best thing you can do is use the smallest one you can, even if this means multiples.  A $25 inverter to run a small AC appliance will use less power than a large $600 inverter uses just sitting there turned on with no load on it.


I'm estimating another 3 weeks or so until completion at this point, so sometime between Mother's Day and Memorial Day - just in time for summer.


Wednesday, February 22, 2017

A New Project

So if anyone happened to notice I dumped this picture here last month as an unintentionally cryptic way to host a quick image for a forum I'm on.  Based on that and the title one might gather that I've got something big I'm working on. 


So a month later I've let my HOA peek their nosy eyes inside and feel I can finally start working on things.  Here's the beast on the day I got it.  It was located up in Oakland so I rode my BMW up and then drove back with the bike strapped in the back.


Its a 2014 Mercedes Sprinter Crew.  The Crew trim comes with rear windows, a rear bench seat, and a headliner.  I got it used for $36k after having sold my toyhauler and truck.  Yes, its technically my daily driver.  Realistically I ride my BMW more than I drive but as far as the HOA is concerned, this is my daily driver.  So the plan then is to turn it into a camper, but since the HOA won't let me park an RV at my home, doing it in such a way as to be stealthy.  Stealth campervan builds are nothing new, but most folks think of the exterior when they say stealth - the idea being that you can park somewhere to spend the night without trouble from the police.  I want my van to be stealth even if somebody from the HOA manages to get a glance inside.  But all of that extra effort will come later.  For the early stages, a van build will generally follow the same progression.  The one thing I will note is that since I work nights and obviously can't work on the van at my home, most of the pictures will be nighttime shots.   I generally try to follow up later with a daytime pic when I remember to take one.

One of the first things I did was install a MaxxAir fan.  There are really only two brand options for these types of forced ventilation fans with several levels of different features.  For the type that I wanted, both brands essentially have all the same features for roughly the same price ranges with one exception:  One has a rain sensor that will close the vent should the sky start to dump while the MaxxAir has a built in cover and therefore is designed to run even in the rain or while driving.  I've seen how well rain sensors hold up, and who wants to deal with stagnant air just because its been raining for several days.  MaxxAir won this decision easily.  One unexpected benefit of doing the fan first was by cutting a 14" square hole in my roof, all subsequent holes became stress free.


My first "injury" occurred around this time.  I pulled the stock headliner down to add the roof rails and install the fan.  Not sure how or why, but my hands had a bad reaction to the backside of the headliner.  They were very painful and swollen, and eventually the skin peeled off.  My hands were fairly useless for the better part of a week.


Insulation will make or break an overnight experience.  My naked van was hitting 95° inside after an hour of sitting in the SoCal winter sun.  At night it was almost immediately ambient.  Even while driving, with only the vents on the dash there was no way to effectively regulate the temperature inside.  After much research, I opted on going with 3M Thinsulate throughout.  At $650, its the most expensive option, but arguably the best. 


As I was finishing up the insulation, my roof rack was finally ready to be installed.  I opted to go with a cookie-cutter variety since the $700 price was attractive, I wasn't sure where my vent and solar would end up when I ordered it, and honestly I just like the look of 3/4 coverage.  I welded in a cross beam for the solar panels.  Solar panels are a popular target for thieves so I used pop rivets and mounted them in such a way that a would-be thief would need a drill or a cutoff wheel to take them without damage.  It was 10x more work for a bit of peace of mind.


I made all the modifications for the panels but took them off to avoid the added weight and fragility while installing the rack.  Once the rack was up I mounted the solar panels the following day.  I generally won't name brands unless one particularly impresses me and Renogy panels have done that in previous projects.  Their performance in less-than-ideal conditions is quite something and yet they're one of the cheaper panels on the market.  One night on the boat I was looking at the first planets starting to become visible while still making 0.3A with 2x50w Renogy panels.  I had a single 100w panel on my toyhauler as well and I consistently found that if there was enough light to see words on a page, I was making power.  In direct sun, a 100w Renogy panel will top out at about 5.8 amps.  On an overcast day?  About 4 amps.  On a dark and stormy day or while parked in the shade?  About 3 amps.  Most campervan conversions seem to be running around 3-400w and around 400Ah worth of battery storage.  But I've found that most solar installations are piss-poor at best, and much of the potential energy is lost due to some simple design errors.  Based on previous RV experience and the low light performance of these panels, I suspect I should be able to get by with 200w of solar and 210Ah of batteries.  I can always add more.  I tried to mount them so that they weren't terribly obvious from the ground.


Notice that the panels cannot be blocked by shadows of any antennas or other roof denizens.  Because of the way panels work, even a slight shadowing from an antenna can easily reduce your panel output by 25% or more.   I'll touch up on this more and how to maximize your electrical efficiency as I get further along in the build.


Mercedes makes a 4x4 version of this van but at $6,800 option on a new one, and much more than that in the used market due to rarity, I really couldn't justify the cost.  I mean, its still unibody.  Any decent 4wd terrain and you're going to start popping welds so really the 4wd would only be good for mild sand or snow.  Nice?  Sure.  Worth the staggering price difference?  Well, maybe if I get stuck.  Despite this, or perhaps because of this, I wanted some decent lighting in case I need to pick my way through some dicey terrain.  Up front I added a 42" LED light bar.


Meanwhile back inside, the insulation was up and I ran all of the electrical.  Its not super obvious in the picture since everything was tucked up out of the way using those sticky back zip tie mounts.


I added swivel adapters to the front seats thus allowing them to rotate and face the rear.  I also tied the vehicle alternator into the house battery bank via an isolator.  If you aren't familiar, an isolator is simply a high amp relay that you tie in to a circuit that is only on when the ignition is on.  What's a relay?  Its a switch.  So instead of a switch on the wall that you have to remember to turn on and off (which I'll also have), a relay flips the switch anytime 12v is applied to one side of it, in this case whenever the key is on.  The load is small enough that you can easily tie it in to any circuit that isn't terribly sensitive, like the stock radio.  Therefore when the key is on, all of your batteries are charging together.  When the key is off, you cannot drain your starting battery as it is electrically isolated from the house bank.  All of my camper electrical loads will only go to my house batteries and the only tie the house batteries have to the starting battery is via the isolator located under the driver's seat.  With a bit of jiggery-pokery, this essentially gives me two separate but equally usable battery sets.  I can't run down the starting battery no matter what I do in the back, and if/when my starting battery starts to take a dive, I can give it a boost from the house batteries, at least enough to start the engine and go get a replacement.


The following day 1/3 of my wiring fell down, thus making it much more obvious in photos.  By the day after, about an hour's worth of measuring for the ceiling lights was lost when the rest of the wiring fell to the floor.  Oh well.  But I did get some wood for paneling the interior.


Rather than use the stock headliner which is kinda ugly, wastes quite a bit of space, and gives me a gnarly rash, I paneled the interior using 1/8" ply on the roof.  The walls will likely get 1/4".  Its not a huge gain over the stock headliner, but in a space this small, an inch can make all the difference.  It seems like 90% of campervan conversions on YouTube are finished wood.  As nice as it looks, it really made me want to go a different route.  Therefore all of it will be covered so precise cuts aren't needed.


The stock dome light just stuck into a recess in the headliner so I replaced it with a couple LED strips.  Its a bit 'Death Star' but out of direct view so minimal glare.  Red light doesn't ruin your night vision so its useful for my astrophotography hobby.  I'll have warm white LED's for the living space but I'll also have red lights throughout the van on a separate circuit for those times that I need to keep my night vision or not piss off a bunch of grumpy astronomers.


Thankfully its not too ridiculous from the outside.


This was my first time doing any sort of upholstery so I started covering the least visible and potentially most challenging area above the driver and passenger seats first.  This area will be storage and potentially a bed for the kid for the next year or so.  Either way it will be largely out of sight.  It went okay but I definitely learned quite a few lessons and hope the rest goes better.  I'm using speaker carpet for the ceiling and although I'd like to use it for the walls as well, I have two labs that would quickly coat the walls in hair.